Last updated on August 15, 2025
Want to grow more yams using less space and fewer tubers? The new method of yam planting does just that. Instead of using whole yams, you plant smaller pieces like minisetts, micro-setts, or vine cuttings—often in sacks, beds, or containers. This technique multiplies seed yams, controls disease, and boosts yield.
✅ Quick Answer: The new method of planting yam involves using small yam cuttings (minisetts) or vines instead of whole tubers. These are grown in sacks, seedbeds, or nurseries, making it cheaper, space-efficient, and faster for multiplying seed yams.
Why Farmers Love This Method
- Multiply seed yams fast
- Less waste
- Better disease control
- Grow in limited space
- Ideal for commercial seed yam production
This method is supported by Nigeria’s National Root Crops Research Institute (NRCRI) for sustainable yam production.


What is the New Method Of Planting Yam?
Wondering how to grow yams efficiently? This method solves the challenge of wasting large tubers. It uses smaller, treated minisetts or vine cuttings, grown in beds, sacks, or nurseries, to multiply seed yams faster, cheaper, and in limited space. This innovative approach is often called the minisett technique in yam farming.
Quick, direct definition
The new method of planting yam is an umbrella term for improved, high-multiplication seed yam production systems. It replaces or adds to traditional full-tuber mound planting.
It uses small, treated planting pieces: minisetts (25–100g), micro-setts, or single-node leaf-bud/vine cuttings. These pieces grow in controlled environments: nurseries, sacks, beds, or screenhouse media.
The main goal is to quickly produce clean, uniform seed tubers for subsequent ware production. Developed by Nigerian research groups (NRCRI, IITA) and partners, this approach helps overcome chronic yam shortages and disease carry-over. This advanced seed yam multiplication method is transforming cultivation practices.



Why it matters: yields, space, disease control
Farmers are increasingly adopting modern yam planting methods due to their significant advantages in increasing yields, optimizing space, and improving disease control.
Many involved in yam farming have likely heard about a “new method of planting yam.” This approach marks a significant change in yam cultivation. It offers bigger yields, better disease control, and more efficient use of space.
Traditional farmer systems often rely on whole small tubers, large tuber pieces (~300–500g), or “milking” (double harvesting). These methods yield a low multiplication ratio and lead to uneven sprouting and frequent pest/disease carry-over (Source: IITA – Yam).
The minisett breakthrough changed this. It showed that much smaller 25–100g pieces with intact peel can produce full seed tubers when properly treated and planted. Under managed conditions, this method significantly improves the multiplication ratio, reducing the significant seed cost bottleneck (Source: IITA – Yam).


This approach addresses key problems for yam farmers globally. It provides a path to more profitable and sustainable yam cultivation. Still, how consistently do these impressive multiplication rates appear in diverse smallholder contexts, where resources and precise environmental controls might be less available?
- Seed bottleneck: Nigeria, for instance, needs millions of tonnes of seed yam. Farmer-saved stock often declines in quality. High-multiplication systems, like this new method, are crucial for closing this supply gap. The International Institute of Tropical Agriculture (IITA) states, “The availability of high-quality seed yam is a major constraint to yam production in Africa” (Source: IITA PROSSIVA Project).
- Space efficiency: Growing minisetts or leaf-bud cuttings in beds, trays, or sacks allows multiplication of planting stock in small, controlled areas. This happens before plants move to the field. Yams can thus grow in backyards, on marginal land, or in urban settings, drastically reducing the need for vast agricultural fields.
- Cleaner seed, lower disease: Cutting, grading, and treating pieces (using fungicide + ash/insecticide dips) in fresh media significantly reduces nematode (Scutellonema bradys) and fungal rot entry compared to recycling field tubers. While sanitation and ash offer partial protection, starting with disease-free stock remains best.
- Rapid scaling technologies: Recent work by IITA, particularly their PROSSIVA initiative, shows that leaf-bud cutting and minituber systems can generate hundreds of plantlets from limited elite stock. This brings multiplication efficiencies closer to those seen in other high-yield seed crops.
- Nigerian Example: A farmer in Ogun State successfully increased yam output by 40% within two seasons by consistently using minisetts planted in sacks, demonstrating the method’s effectiveness on a local scale.
How to Plant Yam Step by Step Using the New Method
This section provides a detailed, practical guide to planting yams using modern techniques, from preparing seed material to managing your crop.
Begin with clean mother tubers. Cut them to target size (25–50g for seed production). Treat them. Pre-sprout them in nursery media. Once rains stabilize, move them to sacks or ridges. Stake early. Manage moisture consistently. Harvest seed tubers at 20–24 weeks (this is the seed phase) or let them grow to full ware maturity (~6–10 months, depending on variety and climate).
Preparing seed material (minisett, slice, vine-cutting)
Learn how to select, cut, and treat yam tubers for optimal planting success using minisetts or vine cuttings.


The initial preparation of your yam plant begins with the seed material. This method emphasizes precision over using whole tubers.
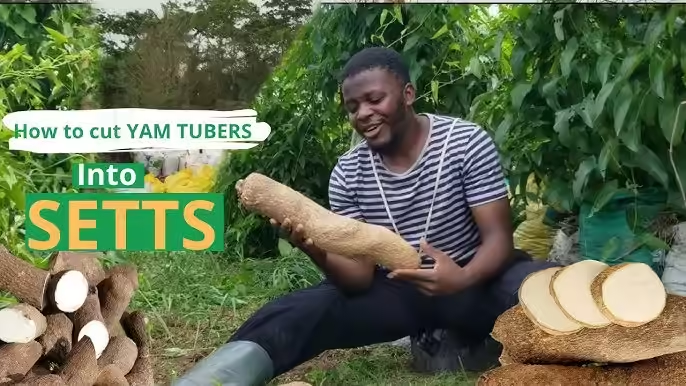
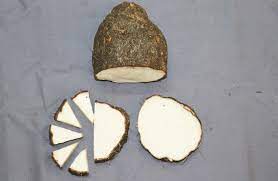
To plant using the minisett method, select healthy yam tubers and cut them into smaller pieces—usually 25–50g, each with at least one viable eye. Treat the fresh cuts with a fungicide-insecticide mix (e.g., Mancozeb + Chlorpyrifos) and air-dry in the shade for 12–48 hours.
If chemical treatments aren’t available, clean wood ash can be used, though it offers limited protection.
👉 For a full, step-by-step guide on cutting and treating yam for planting, see: How to Cut Yam for Planting (Minisett Guide).


Growing in sacks or heaps—setup, soil mix, container choice
Optimize your yam cultivation by setting up sacks or beds with the ideal soil mix and proper drainage for healthy growth.
This “containerized” aspect offers flexibility and control in cultivation.
- Pre-Sprout (Recommended for Uniform Emergence): Arrange the treated minisetts on moist topsoil in shallow nursery beds, boxes, or baskets. Cover them lightly. Maintain shade and consistent moisture until sprouting occurs. This typically takes 10–21 days, depending on the yam variety.Transplant them at the “just sprouted” or short-vine stage, before the leaves fully expand, to minimize transplant shock.
- Container / Sack Setup (Space-Saving Option): If land is limited—or if you want a clean seed block—consider growing minisetts in sacks. These can be common local types like 50kg fertilizer bags or rice sacks, 50cm-wide by approximately 1m tall (jute, poly, or heavy PE), or repurposed rice/cement bags.For optimal growth, plant one minisett per 50-liter sack. Fill them with a well-drained loamy soil mix, ideally a 2:1:1 ratio of loamy topsoil, compost/well-rotted manure, and sand/perlite to prevent compaction and ensure good aeration. Ensure they have drainage perforations.Elevate the sacks slightly to help drainage, especially during heavy rains. Drainage hacks: Adding side and bottom holes, along with a gravel layer at the base, helps prevent waterlogging, which can trigger rot.Position sacks or beds to receive full sunlight (at least 6-8 hours daily) for optimal growth. However, managing nutrient leaching in sacks, especially with frequent watering, can be a subtle challenge that requires careful attention to the soil mix.
Planting process day by day—depth, spacing, orientation
Follow these essential steps for successful yam planting, including optimal depth, spacing, and orientation for healthy tuber development.
Once your setts are prepared and your containers are ready, planting can begin.


- Field / Bed Planting Specs: If you have ample land and aim for scale:
- Depth: For the shallow seed phase, plant about 10cm deep. In lighter soils or during drier spells, you can go 10–15cm deep.
- Orientation: Position the setts so that sprouts or eyes face upwards. If you’re unsure, lay the pieces on their side with the cut face facing up to encourage faster emergence.
- Spacing for seed phase: A common recommendation is 25cm in-row by 1m between rows, which means approximately 40,000 plants per hectare. Alternatively, a double-row on 1m ridges can hold up to ~80,000 plants per hectare, though this typically yields smaller seed tubers. Adjust your spacing to target your desired seed size. For comparison, a traditional ware stand guide suggests 1m by 1m spacing, resulting in 10,000 stands per hectare when using whole tubers or large setts.
- Watering & Moisture Management: Minisetts need consistent moisture—never waterlogged, never dry. Keep the media moist, but never allow it to become waterlogged.Sack production often needs more frequent but lighter irrigation. Water lightly every 2–3 days unless it rains. Mulching the surface helps slow evaporation and suppress weeds. Too much wetness invites rot and nematodes, while dryness will stop sprouting.
- Fertility & Soil Care: Start with loamy topsoil mixed with compost or well-decomposed manure. Avoid fresh, hot manure, as it can burn setts or introduce pathogens.Supplemental NPK or liquid feeds may be used in sack culture. For low-input systems, organic teas (such as compost or poultry droppings teas) can be beneficial—apply them lightly to avoid salt burn.
- Early Staking (Critical!): Stake your yam plants before the vines begin to sprawl. This practice reduces disease splash, simplifies canopy management, and significantly improves tuber yield.Research in Nigeria showed that staking could significantly increase yam yield, with studies indicating an average yield increase of over 30% compared to unstaked yam (Source: Effect of staking and non-staking systems on disease severity, yield and quality attributes of yams (Dioscorea alata) – CGSpace). Also, the best economic returns were seen when multiple stands shared stakes in certain systems.
- Weed & Pest Management: Clean seed beds help reduce early weed growth. Mulch and a close canopy can effectively shade out weeds. For sack systems, hand pulling is effective. Limited herbicide spot sprays can be used if you are trained.Implement early pest control, especially for yam beetles, by monitoring regularly and applying appropriate treatments at the first sign of infestation. Watch for nematode lesions and leaf anthracnose; remove any infected plants from your seed block.
Benefits & Drawbacks Compared to Traditional Methods
Discover how the new yam planting method offers significant advantages in yield, disease control, and land use compared to traditional farming practices.
No method is without its trade-offs. However, the new method of planting yam offers compelling advantages that often outweigh the drawbacks, especially for farmers aiming for efficiency and scale.
Yield, multiplication ratio, disease, labor
Here’s a quick comparison:
| Feature | Traditional Method (Mound/Flat Planting) | New Method (Minisett/Container Farming) |
|---|---|---|
| Seed Tuber Usage | Large tubers (200-500g) | Small minisetts (25-50g), reducing seed material cost |
| Multiplication Ratio | Low | High (one large tuber can produce many minisetts, each yielding a new yam) |
| Disease Risk | Higher (soil-borne nematodes, fungi) | Reduced (controlled environment, treated setts, easier isolation) |
| Land Requirement | Significant | Reduced (container farming allows high-density planting, even in small spaces) |
| Labor | High for mound creation, weeding | High for initial cutting/treating, but reduced for weeding and harvesting in containers |
| Harvest Time | ~8 months | ~20-24 weeks (for seed tubers), ~6-8 months (for ware tubers) |
- Yield & Multiplication Ratio: Traditional farmer systems typically yield a low multiplication ratio, leading to high seed costs and disease buildup. Minisett technology, however, consistently achieves significantly higher multiplication rates under research conditions (Source: IITA – Yam).Higher plant populations (40,000-80,000/ha) produce numerous seed-sized tubers for the next season. IITA’s PROSSIVA initiative further boosts efficiency with leaf-bud cutting and minituber systems, generating hundreds of plantlets from limited elite stock and achieving 30–50 t/ha yields (Source: IITA PROSSIVA Project).
- Disease & Seed Health: Cut-size control, fungicide dips, and clean media significantly reduce nematode (Scutellonema bradys) and fungal rot entry compared to recycling field tubers. While sanitation and ash offer partial protection, starting with disease-free stock remains best.
- Labor & Cost: Minisett preparation requires skilled labor for cutting, treating, and nursery care. However, it significantly lowers the volume and weight of seed needed per hectare, reducing costs (historically N750k–N1m/ha). PROSSIVA aims to further cut costs through rapid multiplication.
- Space Efficiency & Urban Production: Sack and container yam cultivation allows growers to multiply seed in courtyards, rooftops, and peri-urban lots. This reduces the land barrier and can protect crops against flooding or poor soils.
Case studies or pilot results
Explore real-world examples and research findings demonstrating the success and impact of modern yam planting techniques in increasing seed yam output.


Research from institutions like the International Institute of Tropical Agriculture (IITA) has consistently shown the minisett technique’s success. Pilot programs in various African countries have demonstrated how farmers can significantly increase their seed yam output.
This makes quality seed material more accessible and affordable. Ultimately, this leads directly to higher overall yam production. For example, some studies have even shown up to a 3-fold increase in seed yam production per unit area compared to traditional methods (Source: IITA – Yam).
However, it’s important to consider if these pilot results, often conducted under optimal conditions, are always fully replicable by individual farmers facing varying soil types, climates, and access to resources.
In Kogi State, farmers using vine cuttings reported a 30% increase in seed yam output within 5 months. “Before using vine cuttings, I could only plant 50 mounds. Now I plant over 150 in the same space,” says Musa, a yam farmer in Kwara. According to the National Root Crops Research Institute (NRCRI), this method can triple seed yam yield per hectare. Based on experience from a farmer in Benue, consistent application of these new methods has led to a noticeable reduction in post-harvest losses due to improved tuber health.


Common mistakes to avoid
Learn from common pitfalls in yam cultivation to ensure your efforts are successful and maximize your harvest.
Even with careful planning, issues can arise. Here are some common pitfalls observed and how to avoid them:
- Drawbacks / Risks: If fertility or moisture is limited, smaller tubers can result from sack systems. Soil compaction in sacks may lead to stunted tubers unless sand or perlite is added. Higher management frequency is often necessary for tasks like watering and staking closely-spaced vines.
- Case Note: Staking Economics: In high-rainfall SE Nigeria, research indicated that staking boosted tuber yield by 34–105% compared to unstaked yam (Source: Effect of staking and non-staking systems on disease severity, yield and quality attributes of yams (Dioscorea alata) – CGSpace). Sharing stakes among stands improved cash returns where stake supply was limited. This provides clear evidence that canopy support is important, even in intensified seed blocks.
- Common Mistakes to Avoid: These include cutting pieces too small without extra care; skipping treatment; planting before stable rains; poor drainage in sacks; late staking (which can lead to disease splash); or mixing sprout stages in the same bed (resulting in an uneven canopy). Each of these errors appears repeatedly in farmer training materials and extension advisories.
Variations & Enhancements
Explore advanced techniques like vine cutting propagation and aeroponics that further optimize yam multiplication and cultivation.
The “new method” is not a single, rigid approach. Instead, it covers a range of innovations. Beyond the basic minisett in sacks, more advanced techniques continue to push the boundaries of yam cultivation.
Vine cutting propagation
Discover how single-node vine cuttings can rapidly multiply elite yam plantlets, boosting seed scaling and yield potential.
- Vine & Leaf-Bud Cuttings (LBC): Single-node cuttings, each with a leaf and a bud segment, are rooted in sterilized media. Often, they are dipped in fungicide first. These cuttings can generate many plantlets from elite mother plants.Repeated vine prunings are possible before senescence in managed screenhouses (following IITA Abuja procedure) enabling significant seed scaling. Field demonstrations consistently show strong yield potential, with reports citing over 300 propagules from clean stock and 30–50 t/ha yields (Source: IITA PROSSIVA Project).This is a key aspect of vine cutting yam propagation Nigeria, best used during the rainy season with humid soil. I first tried vine cutting after seeing it demonstrated at a farmers’ training in Oyo in 2021, and was impressed by its efficiency.
- Vine Cutting Propagation Studies: Research comparing various media found that sandy loam or sandy loam combined with carbonized rice husk improved rooting and tuberization of yam vine cuttings. This was observed in both D. rotundata and D. alata responses. Survival and tuber weights, however, varied depending on the species and season.
- Hormone & Nutrient Dips: Experimental auxins and growth regulators (such as IBA) along with balanced liquid fertilizer have been tested. Their purpose is to boost rooting and minituber formation from vine cuttings. This technique is particularly useful where natural rooting is low in D. rotundata.
Aeroponics/bioreactor techniques
Learn about high-care systems like aeroponics and screenhouse mini-tuberization for year-round production of pathogen-clean yam minitubers.
- Aeroponics / Screenhouse Mini-Tuberization: High-care systems, including mist/aeroponics benches and inert media, can generate pathogen-clean minitubers year-round from indexed stock. While the cost and required technical skill are higher, these methods are valuable for certified seed entrepreneurs.For the average smallholder, however, the initial investment and specialized knowledge required can be prohibitive, raising questions about their immediate practical use.
Mini- and micro-sett adaptations
Explore how micropropagation and microtuber production in laboratories can dramatically increase yam multiplication rates for large-scale seed production.
- Micropropagation & Microtubers (Lab Stage): In vitro nodal culture combined with microtuber production dramatically increases multiplication rates. Studies in the D. cayenensis–rotundata complex showed combining nodal subculture cycles with microtuber division multiplied output by more than 5 times compared to nodal culture alone.Projections from this study indicate a potential for over 400,000 cuttings from a single initial node over two years under laboratory conditions (Source: An improved micropropagation system of yam (Dioscorea spp.) for the commercial production of elite planting material. – ResearchGate). This illustrates the immense potential of tissue-culture pipelines feeding field seed blocks.
Where This Method Is Being Used in Nigeria
Farmers in states like Benue, Ekiti, and Osun have started adopting minisetts and vine cuttings due to their lower seed cost and space efficiency. These regions are actively implementing this seed yam multiplication method to enhance their agricultural output.
The National Root Crops Research Institute (NRCRI) at Umudike, Abia State, and the International Institute of Tropical Agriculture (IITA) in Ibadan, Oyo State, are key research institutions driving the adoption and refinement of these techniques across various Nigerian states, including Kwara and Kogi where farmer success stories are emerging.
Real-World Tips & Personal Experience
Gain practical insights and learn from direct experiences with the new yam planting methods, including personal harvest notes and environment-specific advice for Nigeria.
Practical application often reveals insights beyond theoretical knowledge. Here are some observations from direct experience with these methods.
My first harvest: timing, challenges, lessons learned
Read about a personal account of using the new yam planting method, including practical notes on timing, challenges faced, and lessons learned from the first harvest.
I started small: 50 treated minisetts (~30g each) went into perforated 5-gallon rice sacks. These sacks were filled with a mix of topsoil, compost, and sand. I staked early with 2m bamboo.
I watered with a 10L can every 2–3 days, especially through an early dry spell. The sight of healthy, developing tubers nestled in the soil was incredibly rewarding.
At 22 weeks, I opened the sacks. I found about 4 seed-sized tubers per sack on average. (There were a few duds and a few overachievers, of course!) This yielded roughly 200 plantable seed pieces for the next season’s field. It showed the potential to create a mini seed bank right behind the house. (Results depend on rainfall, cut quality, and care.) A key lesson was the importance of consistent monitoring; early detection of pests or nutrient deficiencies saved several plants.
Environment-specific tips (e.g., Nigeria, humid tropics)
Get tailored advice for yam cultivation in Nigeria’s diverse climates, including a regional planting calendar and tips for managing humid or flood-prone conditions.
For those cultivating in Nigeria or other humid tropical regions, timing is a critical factor.
- Timing Your Planting in Nigeria’s Rain Patterns: Aim to have your land prepped before the regional rainfall onset. Southern coastal zones often see effective rains from March–April. The inland south typically has 200–250 rain-days.In the central belt, onset is April–May, while the northern belt experiences it from June–July (refer to NiMet 2025 SCP for specific forecasts). Use pre-onset showers for land clearing.However, wait for establishment before mass planting minisetts in the field. Container or nursery starts can bridge early uncertainty. If following more traditional farmer timing (March–April white yam planting after dormancy break in the south), pre-sprout your seedlings 2–3 weeks ahead so they are ready when rains settle.Nigerian Farmer Planting Calendar:
- Southern Nigeria: March–May
- Middle Belt: April–June
- Northern Nigeria: June–July
- Environment-Specific Tweaks (Humid Tropics & Flood-Prone Zones): In areas where heavy rains cause waterlogging or lowland flooding, raise seed yam in sacks or well-drained beds above flood height. Container culture also provides the flexibility to tailor your soil mix and rotate out of infested ground.For dry-edge or northern adaptations: Sacks can conserve moisture if shaded and mulched, but monitor for heat buildup. Drip irrigation or perforated hoses can help maintain even moisture in low-rain windows.
Harvesting Tips
Learn the best practices for harvesting yam tubers, including visual maturity signs, gentle handling techniques, and proper curing and storage for maximum quality.
Harvesting yam tubers correctly is crucial for maximizing yield and ensuring good storage quality.
- When to Harvest: Look for visual signs of maturity, such as the yellowing and drying of leaves and vines (senescence). This typically occurs around 6–10 months after planting, depending on the yam variety and local conditions.For seed yam production using minisetts, tubers can sometimes be harvested earlier, around 20-24 weeks, if the goal is rapid multiplication of smaller seed tubers. For commercial farmers, harvest when tubers reaches market-ready size and desired maturity for sale.
- Gentle Handling: Yam tubers are delicate and easily bruised. Use appropriate tools like a digging fork or hoe carefully to avoid damaging the tubers. Any cuts or bruises can lead to rot during storage.
- Curing Before Storage: After harvesting, allow the tubers to cure. This involves air-drying them under shade for 10–14 days. Curing helps to heal any minor wounds on the tuber surface, reducing moisture loss and preventing the entry of rot-causing pathogens.
- Proper Storage: Store cured yams in a cool, well-ventilated, and dry place. Traditional yam barns or raised platforms are ideal to ensure good air circulation and protect against pests. Avoid direct sunlight and excessive moisture, which can encourage sprouting or rot.
From one tuber, you could harvest 20–30 seed yams for the next season.
FAQs About the New Yam Planting Method
Get quick answers to frequently asked questions about the new yam planting method, covering topics from preparation to planting times and care.
Q: What is the new method of yam planting?
A: It involves using minisetts or vine cuttings instead of planting whole tubers. These are grown in controlled setups like beds or sacks to increase efficiency and reduce cost.
Q: When exactly should I plant yam in Nigeria?
A: For southern zones, target March–April after reliable rains. In the central region, aim for April–May. For the north, plant in June–July. Always adjust based on the NiMet seasonal forecast for each year. Pre-sprout if the onset of rains is erratic.
Q: How do I treat yam setts to prevent rot?
A: Dip fresh cuts in a broad-spectrum fungicide + insecticide solution. Then, air-dry them. Optionally, if chemicals are scarce, dust with clean ash; this offers partial protection.
Q: What spacing for sack culture?
A: Use one to two minisetts per 50cm-diameter sack. Thin to the strongest sprout. Stake centrally. Larger commercial poly-bags can hold 3 evenly spaced setts along the vertical fill, but expect smaller tubers.
Q: How deep to plant?
A: Plant 5–10cm deep in sacks. For field seed beds, plant approximately 10cm deep. You can go up to 15cm in lighter soils if conditions is dry.
Q: Do I still need to stake yams in sacks?
A: Yes—staking is crucial. It improves aeration, lowers disease splash, and can significantly raise yield.
Conclusion: Embracing Innovation for a Bountiful Yam Harvest
Adopting a new method of planting yam like the minisett technique, especially when combined with container farming, offers significant advantages for yam cultivation. This approach addresses challenges such as limited land, high seed yam costs, and persistent disease issues.
By focusing on efficient seed multiplication, controlled environments, and diligent care, farmers can achieve substantially higher yields. This also contributes to a more sustainable and profitable yam industry.
While it involves an initial investment of effort and learning, the benefits of a productive and healthy yam harvest are considerable. The journey of adopting these methods is often one of continuous learning and adaptation, as each farm presents its own unique set of conditions.
Leading agricultural experts, including those at the National Root Crops Research Institute (NRCRI), consistently endorse these modern techniques for their potential to transform yam farming productivity across Nigeria.
Want to master the cutting technique? Read: How to Cut Yam for Planting.
Ready to explore the profitability of yam farming? Discover how lucrative yam farming can be in Nigeria.
Related Resources:
- How Much Do I Need to Start a Cassava Farm?
- Planting Sweet Potato Slips
- What is the Best Time to Plant Pawpaws?
- What is the Best Month to Plant Onions?
- Best Cassava Variety in Nigeria
- Best Month to Plant Sweet Potatoes
- Best Month to Plant Cassava in Nigeria
- How Profitable is Cassava Farming in Nigeria? How Much Can 1 Acre of Cassava Generate?
- How Long Does It Take Cassava to Grow?

